
Why entrust your analytics tagging to Claude Code?
To track your visitors' behavior accurately, Google Tag Manager (GTM) relies on markers built directly into your site's source code: the page type, the section viewed or the element clicked. Adding these tags manually can be long and tedious, page by page.
Claude Code is a command-line AI assistant able to analyze all the files of your project locally. Within a few minutes, it generates a complete tagging plan and can inject it straight into your HTML code after validation. This is precisely the method I used to set up the tagging of my sites such as XLTAG.
Data Layer and Data Attributes: a quick explanation
To design a clean tracking structure, it is essential to tell 2 complementary mechanisms apart:
- The Data Layer: it is a JavaScript object in which the site stores global information about the browsing context (page, user type, product...).
- Data Attributes (HTML
data-*attributes): these are custom HTML attributes added directly to page elements (CTAs, links, FAQs, sections). GTM reads them when the interaction happens to know precisely where and how it occurred.
You will quickly understand with the examples below.
Tutorial: Tag your site step by step with Claude Code
Step 1: Generate the tagging plan
Open Claude Code (you need a license) in the root directory of your web project and ask it to work out a tracking strategy without modifying any files at first.
Here is the prompt to use:
Analyze the code of this site. Propose a tagging plan for Google Tag Manager, without modifying any file.
- The global information of the page must go in the Data Layer.
- Each section gets a data-section attribute.
- Each link or button gets a data-element, a data-element-location and, within a list, a data-element-position.
- Values must be short, lowercase and immediately understandable in an analytics report.
- No personal data (PII) must appear in the values.
- output type: Excel file
If needed, complete the prompt (data-destination, everything in English, no underscores...) if you know your needs perfectly. Otherwise, iterate until you are satisfied.
Step 2: Review and validate the proposed structure
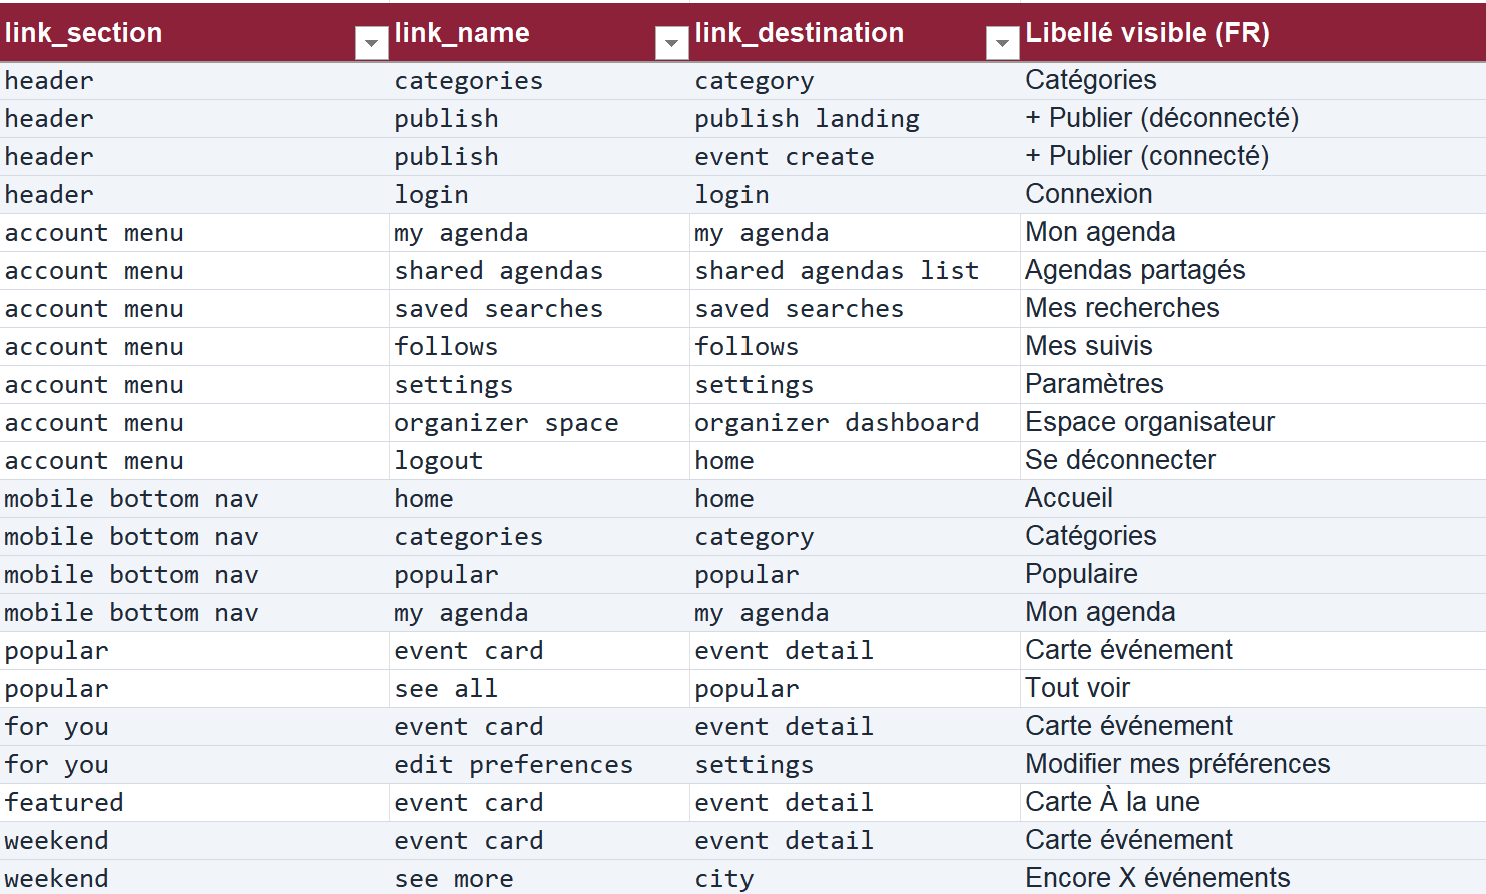
Once the plan is validated and applied, your site's code will look like this:
- Global page variables (Data Layer)
window.dataLayer = window.dataLayer || []; window.dataLayer.push({ page_name: "home", page_category: "home" }); - Tagging of interaction elements (HTML)
<section id="pricing" data-section="pricing">
  <a href="/contact/"
     data-element="contact"
     data-element-location="body"
     data-element-position="1">Request a quote</a>
</section>
🔍 The 3 essential checkpoints:
- Readability: labels must be understandable just by reading a report, without having to open the web page.
- Standardization: all links pointing to the same destination must use the same name. Use the other variables (data attributes) to tell them apart.
- Privacy: no personal data (name, email address, identifier) must show up in the attributes.
Step 3: Implement the tagging
2 approaches are possible depending on your workflow:
- Guided approach: ask Claude Code to give you the exact list of changes file by file, then apply them yourself or pass them to your development team.
- Automated approach (recommended): give Claude Code write access to the folder so that it applies the changes directly.
(Security recommendation: always back up your project or work on a dedicated Git branch before running the automatic modification, then check the list of modified files. For FTP access, use WinSCP for example so that it does not remember the access password. If in doubt, it will be able to guide you!).
Step 4: Connect with Google Tag Manager and GA4
There are 2 options: either you have already set up GTM and you just need to adapt it with the new variables. Or you are only getting started. In that case, using AI to do it yourself is good practice but you will not get the optimization an expert would offer you, such as the installation of server-side tracking, which will keep you from losing your conversion signals to GA4 and your advertising platforms.
Shall we talk?
Tools
- Claude Code: reading the site code, Excel tagging plan, implementation in the HTML.
- Google Tag Manager: adapting the setup to the new variables.
- Google Analytics 4: receiving the events and their parameters.
The tagging plan is part of the tracking expertise.